> For the complete documentation index, see [llms.txt](https://docs.testwheel.com/llms.txt). Markdown versions of documentation pages are available by appending `.md` to page URLs; this page is available as [Markdown](https://docs.testwheel.com/api-test.md).
# API Test
**API testing** is a critical component of the software development life cycle, ensuring that backend services function reliably and efficiently. **TestWheel** offers a comprehensive, end-to-end automated testing solution that simplifies and streamlines the API testing process.
With its **user-friendly interface**, TestWheel allows users to create and manage test cases in just a few easy steps. Whether you're a seasoned tester or someone with no coding experience, TestWheel empowers you to perform API testing seamlessly and effectively.
Our platform also supports **customized and automated API call sequences**, enabling users to replicate complex workflows, validate response accuracy, and detect unexpected errors. This powerful functionality helps teams maintain consistent performance and quickly identify issues before they reach production.
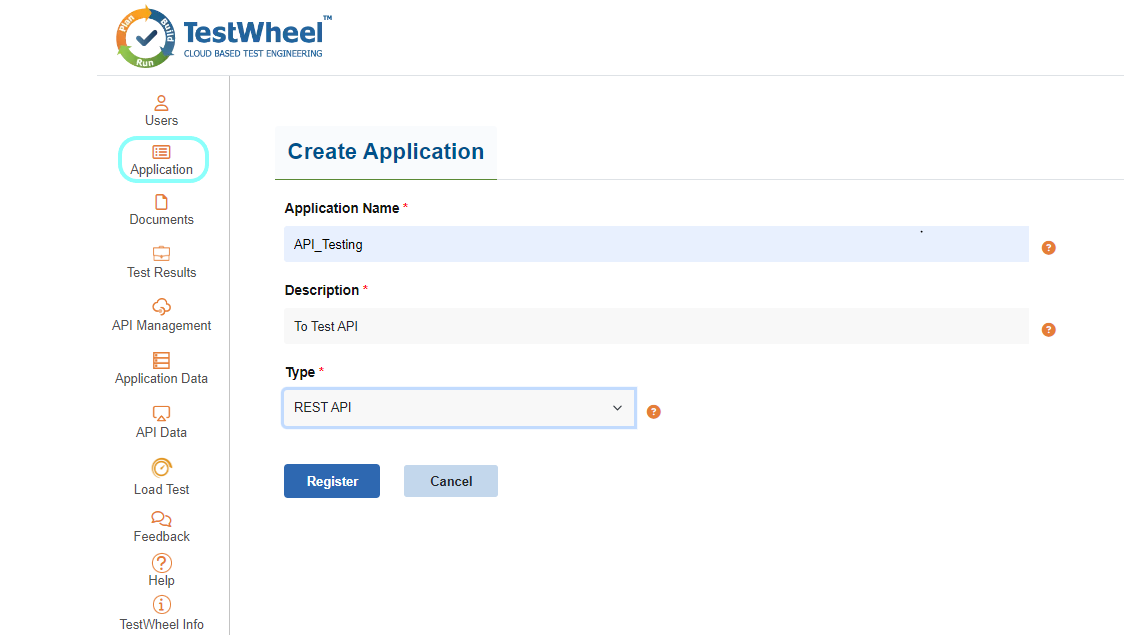
## To start with **API Testing**
Create an application within Testwheel and select the type as REST API and proceed to register it with Testwheel. For guidance, please refer the image provided below.
## **Adding Testcase For API Testing**
After creating the application, navigate to the **API Test** module from the menu. On the **API Test** page, the application drop-down displays two application types: **REST API** Application and **Web** **Application**. When a **Web Application** is selected, the **Fetch API Data** option becomes available. After executing a web test, all APIs captured during the test run are listed. Click **Fetch API Data** to load the captured API list.The captured APIs can then be reused for **API testing** within **TestWheel**.Please refer to the below image.

If you select a REST API Application, choose the preferred testing method from the following options:
## Swagger Import
Enter the **Swagger URL** in the provided field and click the **Fetch icon** to automatically import all available API endpoints. Once the endpoints are loaded, users can select the specific API endpoint for which test data needs to be generated and then click the **Generate Test Data** option. Alternatively, users can manually enter test data using the **Edit icon**.
When users click **Generate AI Test Data**, three test data rows are automatically generated: **Positive**, **Negative**, and **False Positive**. These generated test cases can be modified further if required. After entering or verifying the test data, the test case is enabled and ready for execution. Refer to the screenshot below for guidance.
## **Manual API Test Setup**
Click the **Add Test Data** button and fill in the required fields, including: Test Name, HTTP Method, Target URL, Params, Authorization, Header, and Body. Then save the changes.
## **JWT Authentication**
If you select **JWT Authentication**, TestWheel enables testing of secured APIs that require JWT-based authentication for access control and response validation. To configure JWT authentication:
Click **Add JWT Data** to open the JWT authentication configuration window. Enter the required details, including: HTTP Method, Target URL, Params, Authorization, Headers, and Request Body. Click Save to store the JWT configuration. Once the JWT data is saved, the following options become available: **Edit JWT Data** – Modify the existing **JWT** configuration. **Add Test Data** – Add API test case details.**Click Add Test Data** and enter the required API test information. After saving the details, the API test cases are displayed in the test list(refer to the screenshot below).
## **Test Trigger for API Testing**
After adding the **API test cases**, navigate to the **Application** page and click the **Run** icon to execute the test. If both a **web test** and a **Fetch API test** are configured for a **Web Application**, **two run icons** are displayed on the Application page, one for the **Web Test** and another for the **Fetch API** Test. After entering the Fetch API test data, click the **Fetch API** Test run icon to execute the API test automatically. Refer to the image below for guidance.
## **API Test Report**
To access the API test results, navigate to the test results page and click on the report icon to download the test report for viewing. Please refer to the image below for guidance.
API Test Report PDF
---
# Agent Instructions
This documentation is published with GitBook. GitBook is the documentation platform designed so that both humans and AI agents can read, navigate, and reason over technical content effectively. Learn more at gitbook.com.
## Querying This Documentation
If you need additional information that is not directly available in this page, you can query the documentation dynamically by asking a question.
Perform an HTTP GET request on the current page URL with the `ask` query parameter, and the optional `goal` query parameter:
```
GET https://docs.testwheel.com/api-test.md?ask=&goal=
```
`ask` is the immediate question: it should be specific, self-contained, and written in natural language.
`goal` is optional and describes the broader end goal you are ultimately trying to accomplish on behalf of the user. GitBook uses it to tailor the answer towards what is most useful for that goal.
The response will contain a direct answer to the question and relevant excerpts and sources from the documentation.
Use this mechanism when the answer is not explicitly present in the current page, you need clarification or additional context, or you want to retrieve related documentation sections.
