# Introduction

TestWheel is an evolutionary cloud-based test automation solution that aids in achieving both structured manual and automated tests in parallel. Script-less Automated Testing with TestWheel starts right from the development unit test. TestWheel’s assiduous approach towards automated testing brings you a quality outcome. TestWheel offers users the following powers of web automation framework to enhance the experience using cloud computing. The Automation Framework Tool of TestWheel  covers the entire test cycle of an enterprise’s web,mobile and desktop application. Along with the test run environment, we Plan, Build, and Run your test. Our automated testing service aims at improving the client’s web,mobile and desktop application by reducing human effort and time Build and Run your test.

TestWheel provides a user-friendly and efficient approach to automated testing, with industry-standard framework and dynamic resource allocation, resulting in faster and more reliable testing without the need for scripting or additional manpower.

Try TestWheel solution at  [TestWheel](https://www.testwheel.com) and we ensure to take you to the next level of Automated Testing Solutions, Services, Infrastructure, and platforms on the cloud; and on premises. Script-less automated tests come with a high industry standard framework in less time and resources dynamically.


# How it works

The scope of the application is to automate the testing process to save cost and time, using various designs and the test strategies. Script-less automated testing starts right from the development unit test to reduce human effort and time to Build and Run tests. Automation Framework Tool of TestWheel covers the entire test cycle of an enterprise' Web, Desktop, API, Performance/Load, Mobile and Security Testing . Along with test run environment, it includes options to &#x20;

1. Plan&#x20;
2. Build &#x20;
3. Run tests. &#x20;

TestWheel, the cloud-based automation testing tool designed to help you automate your testing procedures, reduce testing costs, and improve application quality. In this page, we will provide an overview of how TestWheel works and how it can benefit your organization.

1. **Start by setting up your environment:**\
   To Start using TestWheel, you will need to set up your testing environment. This involves connecting your applications and devices to the TestWheel platform, Selecting the testing scenarios you want to automate, and defining the testing parameter&#x73;**.**
2. **Select your testing scenarios:**\
   Once your environment is set up, you can start selecting the testing scenarios you want to automate. TestWheel supports a wide range of testing procedures, including manual testing, web application testing, API testing ,Mobile application testing, Desktop application testing, Performance/Load testing,  and Security testing. You can choose to automate all or some of these procedures, depending on your needs.
3. **Build your tests:**\
   Once you have selected your testing scenarios, you can start building your tests. TestWheel provides a hybrid framework on the cloud that includes data-driven, keyword-driven, and UI object-driven testing based on the industry-standard Page Object model. This allows you to create tests quickly and easily, without the need for complex codin&#x67;**.**
4. **Execute your tests**\
   Once your tests are built, you can start executing them. TestWheel provides a comprehensive suite of testing tools that allow you to run tests on multiple platforms, devices, and browsers, ensuring that your applications are thoroughly tested before release.
5. **Analyse your results:**\
   Once your tests are complete, you can analyse the results to identify any issues or vulnerabilities in your applications. TestWheel provides detailed reports and insights that help you to identify the root cause of any issues and provide actionable insights for remediation.
6. **Improve your testing procedures:**\
   Finally, TestWheel allows you to continuously improve your testing procedures by providing real-time feedback and insights into your testing process. This helps you to identify areas for improvement and make changes to your testing procedures to improve application quality and reduce testing costs.


# User Registration

To access TestWheel’s cloud-based automation tools, register for an account through our website. Registering for an account grants you access to a range of features and services tailored to your testing needs. Initially user will be granted free trial period of **14 days** with all features enabled. Later the user needs to subscribe for continued use of TestWheel application.\
\
Once User clicks on the **Join free today** user will be directed to the sign-up page as displayed below.

<figure><img src="/files/styiYhBXnAHjgQH6hqJY" alt=""><figcaption></figcaption></figure>

The user will receive a **verification email**, as shown below, Click the Get started free button.

<figure><img src="/files/z4PN6rtgU2CEQwDqyObs" alt=""><figcaption></figcaption></figure>

The user must activate their account within 24 hours. If not, the verification link will expire, and the user will need to resend the activation email to complete the account activation.

<figure><img src="/files/Xh5JrTJoswhu6IcGAmT5" alt=""><figcaption><p><kbd><strong>Activation Email Template</strong></kbd></p></figcaption></figure>

Upon clicking the **Activate** button, user will be redirected to **Login Screen** as displayed below.

<figure><img src="/files/a9r3sN04wvTig4YnfF2p" alt=""><figcaption></figcaption></figure>


# Login

This page provides a comprehensive overview of TestWheel's login methods and their respective functionalities.

TestWheel offers multiple secure and user-friendly login options designed to cater to different user preferences and enhance accessibility. Each Method is tailored to ensure robust authentication, seamless user experience, and data privacy.\
\
The login methods currently supported by TestWheel include:<br>

1. **Standard Email and Password Login**\
   &#x20;User can log in using their registered Business email address and a secure password. This method includes features such as "Forgot Password" and email verification to ensure account security and user Identity validation.\
   \ <br>

   <figure><img src="/files/KJxhfM1G5Qz1iYh3Glcn" alt=""><figcaption></figcaption></figure>
2. **Single Sign-On (SSO)** \
   **SSO** is an authentication process that allows users to access multiple applications with one set of login credentials. Instead of creating and managing separate usernames and passwords for every app, users can sign in once using a trusted identity provider, such as **Google** or **Microsoft**, and gain access to all integrated systems.

   SSO enhances both **security** and **convenience**, particularly for organizations that use centralized identity management.\ <br>

<figure><img src="/files/XzoaXhttmkdA2bMYqjs6" alt=""><figcaption></figcaption></figure>


# Dashboard

This page provides an overview of the Dashboard screen that appears after a successful login, highlighting its layout, key components, and core functionalities.

Once users log in to the Testwheel platform, they are directed to the **Dashboard**, which serves as the central hub for navigating and interacting with various features of the application. The Dashboard is designed to offer a clear, concise, and user-friendly interface that provides quick access to critical information and tools based on the user’s role and permissions.<br>

<figure><img src="/files/uBg3UlMsnXTPBYAhq1TE" alt=""><figcaption><p><kbd><strong>Dashboard Page</strong></kbd></p></figcaption></figure>

The image above showcases the Testwheel Dashboard page, which provides a structured and intuitive layout for seamless navigation and quick insights.On the **left-hand side**, users will find a vertical navigation panel that lists all the core **modules** of the application, enabling easy access to different functionalities such as Application Management, Test Management, User Management, Reports, and more.\
\
The **main dashboard area** features **four dynamic graphical widgets**, each representing a key performance or usage metric:

1. **Test Result Summary -** Displays a visual breakdown of recent test outcomes, such as Passed, Failed, Blocked, or In Progress, helping users track test execution at a glance.\ <br>

   <figure><img src="/files/1KMn3AYdbVqUK4MW0Uhu" alt=""><figcaption><p><kbd><strong>Test Result Summary Graph</strong></kbd></p></figcaption></figure>

2. **Overall Result Summary -** Provides an aggregated view of test results across all modules or selected filters, offering a high-level perspective on testing effectiveness.<br>

   <figure><img src="/files/EmbHj6jF1j2L1BSMbiDG" alt=""><figcaption><p><kbd><strong>Overall Result Summary Graph</strong></kbd><br></p></figcaption></figure>

3. **Application Summary -** Highlights test-related data specific to individual applications within the system, helping users monitor app-wise performance and coverage.<br>

   <figure><img src="/files/liEr4mDAnZgyCq0c5q5N" alt=""><figcaption><p><kbd><strong>Application Summary Graph</strong></kbd><br></p></figcaption></figure>

4. **Organization User Status -** Visualizes user activity and status across the organization, including active vs. inactive users, roles distribution, and recent logins.<br>

   <figure><img src="/files/FpjUvJJawD71p54Azzyl" alt=""><figcaption><p>Organization User Status Graph</p></figcaption></figure>


# User Groups

This page offers a comprehensive overview of the User Management tab, outlining the process of adding new users, assigning roles, and configuring action permissions for each user.

The **User Management** section is a central component of administrative control within the platform. It enables authorized users to efficiently manage access, define responsibilities, and maintain role-based security across the organization.<br>

**Key Functionalities Include:**

1. **Adding New Users**\
   Administrators can quickly onboard new team members by entering essential details such as name, email and role. The system supports user uploads for large-scale onboarding.<br>
2. **Role Assignment**\
   Each user can be assigned a specific role (e.g., Admin, Tester, Manager), which governs their level of access and control within the system. Roles ensure that users can only perform actions relevant to their responsibilities.<br>
3. **Managing Action Types (Permissions)**\
   Fine-grained permissions empower administrators to manage user access with precision, including the ability to activate or deactivate user accounts, as well as permanently delete users when necessary.<br>


# Add User

This page explains the process of adding a sub-user through the admin login, including the required details and configuration options.

A sub-user can be added from the admin login by simply entering their email address and selecting the appropriate role. Upon clicking the **Invite User** button, an invitation email is sent to the specified address, containing a registration link for the sub-user to complete their account setup.\ <br>

<figure><img src="/files/8QK1aSixoGDY4Iv0drPk" alt=""><figcaption><p><kbd><strong>Add new user Screen</strong></kbd></p></figcaption></figure>


# Registration

This page provides a detailed explanation of the sub-user registration process.

It outlines the steps a sub-user follows after receiving an invitation email, including accessing the registration link, filling out required information, and activating their account to gain access to the platform.\ <br>

<figure><img src="/files/4BbXcQoQdbmmTLGojSOG" alt=""><figcaption></figcaption></figure>

The email shown above is the invitation that a sub-user receives after being registered by an admin.\
Upon clicking the **"Register"** button in the email, the user will be redirected to the Sub-User Registration page, as shown below. On this page, the user is required to fill in their **personal details** to complete the registration process and activate their account.\ <br>

<figure><img src="/files/l6x5uwA5thGA6mq59yMW" alt=""><figcaption></figcaption></figure>

After filling in all the required details and clicking the "**Submit**" button, the user will be redirected to the login screen, as shown in the image below.\
\ <br>

<figure><img src="/files/swjl9NuazdzVukC8RlJr" alt=""><figcaption></figcaption></figure>

At this point, the **admin must activate the sub-user account** to grant access. Once activated, the sub-user can log in and begin using the application.<br>


# Activation

This page describes on how Sub User account gets activated and it's use case

Once a Sub User registers by providing their login credentials, the Admin can log in to the system and activate the Sub User account through the User Module. The Admin has full control over the activation status of all Sub User accounts.

<figure><img src="/files/4o986yLdFTHh0qLM1mbC" alt=""><figcaption><p>Admin User Module</p></figcaption></figure>

Once the Sub User logs in to TestWheel, they will have access only to the **Application**, **Documents**,**Application Data** and **Test Results** modules. From the Sub User interface, only **Functional Testing** can be performed. The image below displays the Sub User dashboard layout.<br>

<figure><img src="/files/iyJkcgmzBDyjjfVJSfLT" alt=""><figcaption></figcaption></figure>


# Application

This page describes about the Application Module in TestWheel application.

The **Application** module in **TestWheel** serves as the foundation for setting up and managing applications intended for various types of testing. This module enables users to create applications tailored to specific testing needs, ensuring flexibility and comprehensive test coverage across platforms and technologies.

TestWheel supports the creation of applications under three primary testing categories:

**1. Functional Testing**

Functional Testing applications are designed specifically for testing **web-based applications**. These applications allow testers to simulate user interactions, verify business logic, validate UI elements, and ensure that the application behaves as expected under various conditions. It is ideal for end-to-end testing of websites, web portals, and enterprise web systems.

**2. REST API Testing**

REST API Testing applications focus on the **validation of API endpoints**. Users can create applications to test RESTful services, ensuring that APIs return the correct responses, handle edge cases, and integrate properly with other components. This is especially useful for testing backend services, third-party integrations, and microservices architectures.

**3. Mobile Testing**

Mobile Testing applications are intended for testing applications on **Android and iOS platforms**. Testers can create test suites that cover various mobile-specific scenarios such as touch interactions, orientation changes, performance on different devices, and OS-level behaviors. This ensures that mobile apps deliver consistent functionality and user experience across devices.\
\
In addition to the above testing categories, **TestWheel allows users to perform Load Testing and Security Testing** on any application, regardless of its type. These capabilities help ensure that applications can handle high volumes of traffic and are protected against potential vulnerabilities or security threats.

Whether you are testing a web app, API service, or mobile application, the Application module provides a robust and scalable framework to manage all your testing needs in one unified platform.

**4.Desktop Testing**

**Desktop Testing** applications are designed specifically for testing Windows-based desktop applications. These applications enable testers to automate and validate user interactions within desktop environments, ensuring that the application functions correctly across different system configurations.

Using **desktop testing**, testers can simulate real user actions such as clicking buttons, entering data, navigating between screens, and verifying UI elements within installed applications. It helps in validating business logic, workflows, and overall application behaviour in a native desktop environment.

TestWheel integrates with tools like **WinAppDriver** to support automation of desktop applications, making it suitable for testing enterprise desktop software, legacy systems, and custom-built **Windows applications**. This ensures reliable performance, stability, and compatibility of desktop applications across various environments.


# Create Application

This page describes on how to create a application in TestWheel

From the Dashboard, users can access the **Application** module by clicking the **Application icon** available in the left-hand navigation panel. This page serves as the central workspace for managing all applications configured in TestWheel. Users can create new applications, manage existing configurations, enable testing features, and maintain version-specific testing assets from a single interface. The Applications page also provides quick access to application settings, execution options, and environment configurations required for **Functional** and **API testing** workflows.

<figure><img src="/files/xwxQgzL5dcJeG3UgYZTg" alt=""><figcaption></figcaption></figure>

To register a new application, users must click the **Add New Application** button, which opens the **Create Application** screen. In this section, users are required to provide application details such as the application name, description, application type, and environment configuration. Based on the testing requirement, users can select either **Web Application** or **REST API** as the application type. Additional capabilities such as **API Capture** can also be enabled during registration to monitor **API** requests during execution. After entering all required details, clicking the **Register** button saves the configuration and adds the application to the system<br>

<figure><img src="/files/CSC9f2QEHZrXrZRrMWQJ" alt=""><figcaption></figcaption></figure>

Once the application is successfully registered, **TestWheel** automatically redirects users to the **Applications** page, where the newly created application appears in the Application List table. For **Functional type** applications, a **Healing toggle** is displayed under the Healing column. Enabling this option activates the **Self-Healing** capability, which automatically identifies UI locator mismatches during test execution and updates the affected locators dynamically. This feature helps reduce automation failures caused by UI changes and minimizes the need for manual maintenance of test scripts.

<br>

<figure><img src="/files/gP4kBTaIb91fEUUwBxZ9" alt=""><figcaption></figcaption></figure>

When **API Capture** is enabled during application registration, the Applications page additionally displays two execution options: the **Browser** **Run icon** for executing **Web Functional tests** and the **API Run icon** for executing captured API test cases. To execute **Web Functional** testing, users must first upload the required testing documents in the **Documents module**. For **API testing**, users must configure and **fetch API** request data in the **API Test** page before execution.

<figure><img src="/files/Ys2wrcA1Ra6BZreUy7FL" alt=""><figcaption></figcaption></figure>

The **Version Management** feature allows users to maintain separate testing assets for different releases of the same application. Using this functionality, teams can manage version-specific document uploads, configure release-wise test setups, isolate testing environments, and maintain historical version tracking for controlled regression testing. Organizing testing assets based on application versions helps improve release management, execution accuracy, and overall testing efficiency.

For simplifying functional test creation, TestWheel provides the TestWheel Recorder, a browser-based recording utility available as a Chrome extension. Users can install the extension directly from the Chrome Web Store by clicking the [Click here](https://chromewebstore.google.com/detail/nhkpemikinijmhnogncmnnkdbolobhjk?utm_source=item-share-cb) **Install the TestWheel Recorder in user’s chrome browser from Chrome Web Store** link and launch it within the browser while accessing the target web application. Once the recorder is started, a separate recording tab opens where users can manually perform application actions. During recording, the plugin automatically captures user interactions, UI element properties, and browser actions in the background and displays the captured information in a structured format.

After the recording process is completed, users can click the **Export to TestWheel** button to transfer the recorded test data directly into the corresponding application within TestWheel. The exported actions are automatically converted into reusable functional test assets, making them immediately available for Functional Testing execution and further test management activities.

<figure><img src="/files/lLijIKKiAEWUUEsJ0JpC" alt=""><figcaption><p>TestWheel Recorder Screen</p></figcaption></figure>

<br>


# Documents

This page describes about the Documents module in TestWheel Application

After creating an application, the next step is to **import Test Data** for **Functional** and **Mobile Testing**. TestWheel offers multiple methods for importing test data, including:

* Uploading **Excel sheets**
* Using the **TestWheel Recorder** (Chrome Extension)
* Importing **Manual Test Cases** from **Azure DevOps**

In this section, we'll focus on uploading test data using **Excel sheets**.

Users should first download the predefined Excel templates available on the **Documents** page. After filling in the required information, the following three files must be uploaded to complete the test data setup:

* **Authentication.xlsx** – for login credentials and authentication data
* **UIProperties.xlsx** – for capturing UI elements and properties
* **UserData.xlsx** – for general test data and input values

Uploading these sheets ensures the application has all the necessary data to execute automated tests effectively.\ <br>

<figure><img src="/files/KS9KYslp3mLmf5yrIcle" alt=""><figcaption><p>Application Documets Page</p></figcaption></figure>


# Uploading Excel Test Templates

This Page Describes on how to download sample document and fill in the datas.

After downloading the sample documents, users should follow the instructions below to accurately fill in the test data required for **Functional Testing**.<br>

**To upload a test document, follow these steps:**

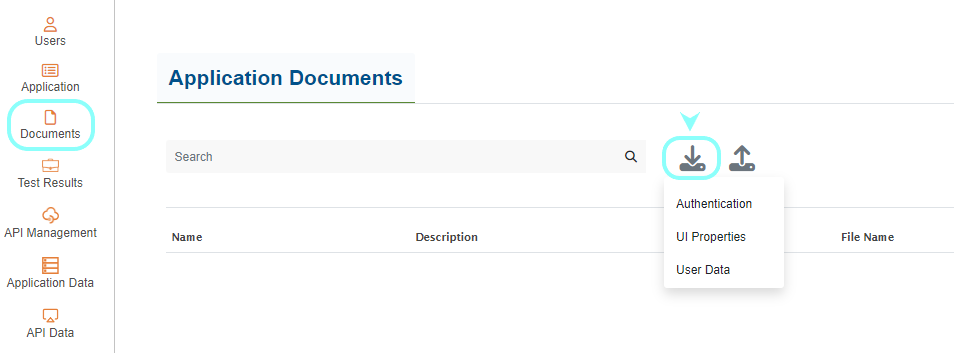
1. Click the Documents icon form the menu bar
2. On the Documents Page, select the icon labeled Download Button. This action will trigger a dropdown menu, allowing you to download sample Testcase sheets.

<figure><img src="https://docs.testwheel.com/images/document-upload-images/download_sample_sheets.png" alt=""><figcaption></figcaption></figure>

### **1. Authentication.xls** <a href="#id-1authenticationxls" id="id-1authenticationxls"></a>

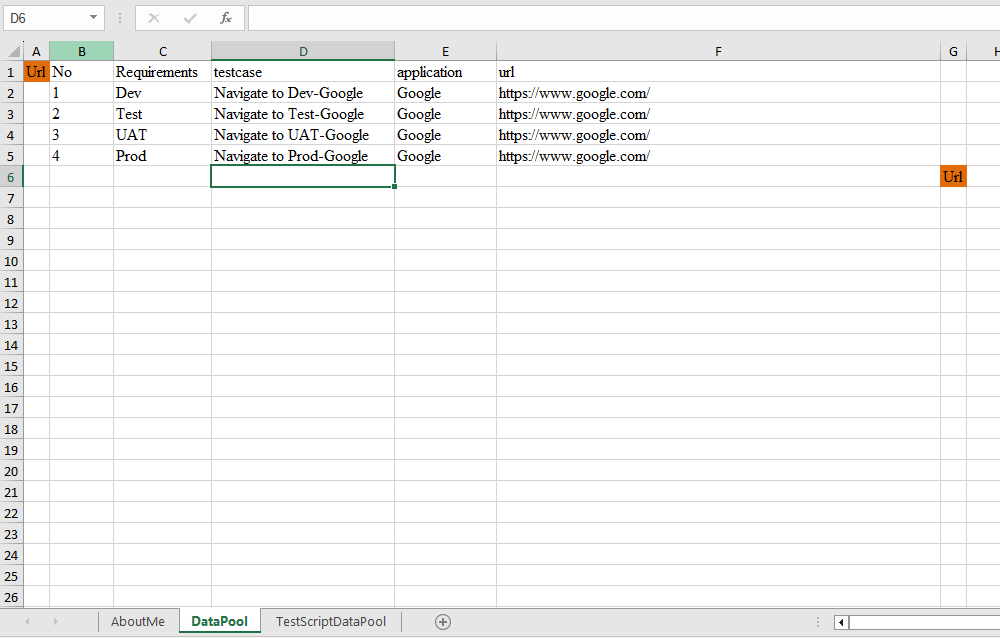
Download the Authentication.xls file from the dropdown, which contains sample test data for Google search. Users can modify the data sheet according to their specific use cases. The Authentication.xls file comprises three sheets: AboutMe, DataPool, and TestScriptDataPool. The AboutMe sheet provides comprehensive instructions on populating the DataPool and TestScriptDataPool sheets. In the DataPool sheet, users are required to input the URLs for each environment they intend to test.

#### **Usecase for DataPool Sheet** <a href="#usecase-for-datapool-sheet" id="usecase-for-datapool-sheet"></a>

1\. It is mandatory that the Starting Tag and Ending Tag names match.

2\. The Header Name must remain unchanged and should not be replaced.

3\. Users are required to input application URLs for all four environments.

4\. The Requirement column should only contain Dev, Test, UAT, Prod. Values must not be replaced.

<figure><img src="https://docs.testwheel.com/images/document-upload-images/auth-DataPool.png" alt=""><figcaption></figcaption></figure>

### **2. UIProperties.xls** <a href="#id-2uipropertiesxls" id="id-2uipropertiesxls"></a>

Download the UIProperties file, containing sample test data for Google search. Users can modify the data sheet according to their specific use cases. The ***UIProperties*** file includes an AboutUs sheet, providing detailed instructions on populating the UIProperties sheet. Users have the option to create a new sheet name and add properties to it.

#### Usecase for UIProperty sheet <a href="#usecase-for-uiproperty-sheet" id="usecase-for-uiproperty-sheet"></a>

1\. Users should create a new sheet with a name that contains no spaces.

2\. The starting and ending tags should have the same name.

3\. Headers include name, type, value, action, id, description, expectedresult, pass\_actualresult, and fail\_actualresult.

4\. The Name column should contain the step or action name.

5\. The Type column indicates the type of CSS element properties (e.g., Id, Name, xpath).

6\. The Value column should be filled with corresponding type values (e.g., for css locator=Id, value=“firstName”).

7\. The Action column should contain the Selenium action to be performed.

8\. The ID column should be filled with the ID value.

9\. The Description column should provide a brief note on the test case.

10\. The ExpectedResult column should specify the expected result after executing the test case.

11\. The PassActualResult column should describe the outcome of a passed test case.

12\. The FailActualResult column should describe the outcome of a failed test case.

<figure><img src="https://docs.testwheel.com/images/document-upload-images/uiprop-sheet.png" alt=""><figcaption></figcaption></figure>

### **3. Test Scenario** <a href="#id-3test-scenario" id="id-3test-scenario"></a>

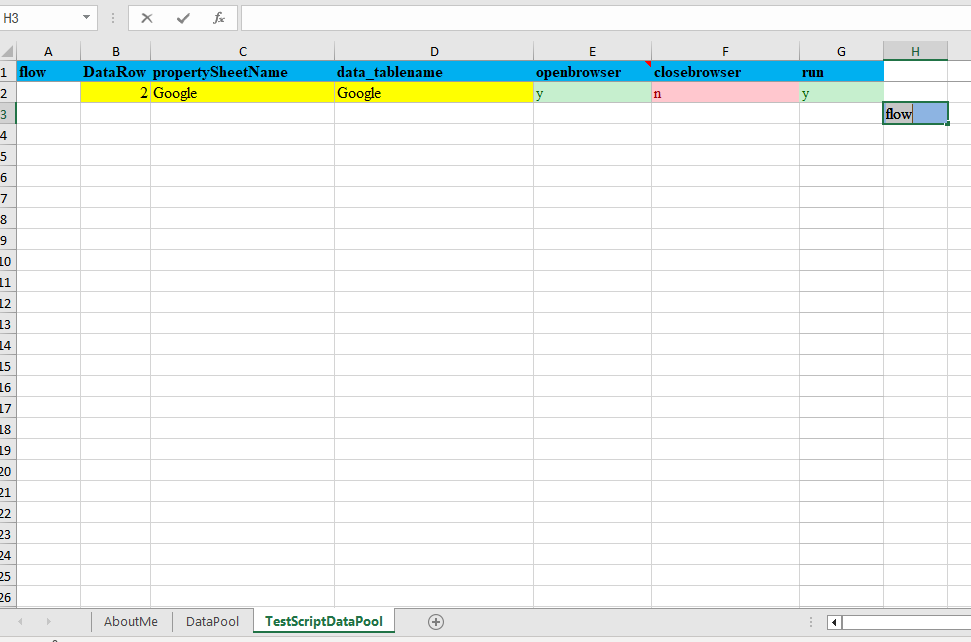
After completing the UIProperties sheet, users should populate the test scenario data in the TestScriptDataPool sheet within the Authentication.xls file.

#### Usecase for TestScriptDataPool Sheet <a href="#usecase-for-testscriptdatapool-sheet" id="usecase-for-testscriptdatapool-sheet"></a>

1\. It is mandatory that the Starting Tag and End Tag names match.

2\. The Header Name must remain unchanged and should not be replaced.

3\. The DataRow column should always start with the vlaue 2.

4\. The PropertySheetName should match the name declared by the user in their UIProperties Sheet Name.

5\. The Data\_TableName represents the module name declared by the user in their UserData Sheet and the Data\_TableName should be unique.

6\. The OpenBrowser and CloseBrowser columns should only contain Y or N values to indicate whether to open/close the browser.

7\. The Run column indicates whether the user intends to run this module or not.

<figure><img src="https://docs.testwheel.com/images/document-upload-images/auth-TestscriptDataPool.png" alt=""><figcaption></figcaption></figure>

### 4. User Data <a href="#id-4user-data" id="id-4user-data"></a>

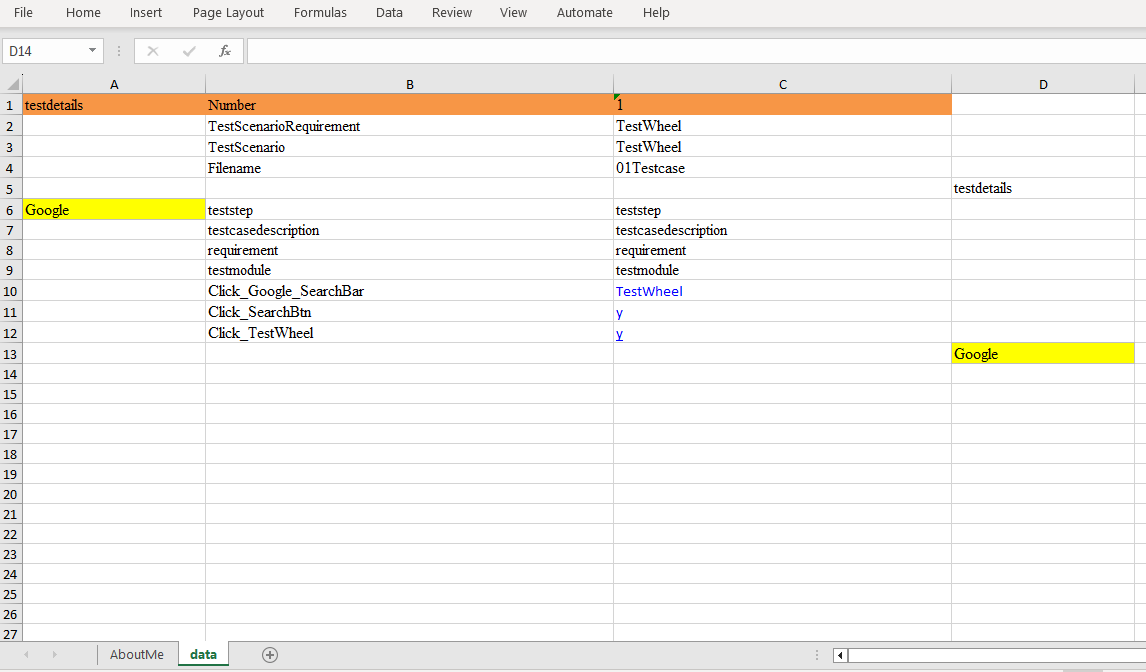
Upon completion of the Test Scenario data, download the UserData file, which includes sample test data for Google search. Users can modify the sample sheet according to their needs. It comprises the TestData values corresponding to the UIProperties listed in the UIProperties sheet.

#### Usecase for TestScriptDataPool Sheet <a href="#usecase-for-testscriptdatapool-sheet-1" id="usecase-for-testscriptdatapool-sheet-1"></a>

1\. It is essential that Columns A & D only contain values corresponding to data\_tablename as declared in the Authentication.xls TestScriptDataPool sheet. These values represent the start and end tag names, each representing a module.

2\. The TestDetails Tag will be present by default at the beginning.

3\. Column B denotes the field, while C signifies their corresponding values.

4\. TestStep, TestcaseDescription, Requirement, TestModule are mandatory rows in Column B. Their values must be entered in Column C for every declared tag. Additionally, users are required to input data for the UIProperties.xls Name column and their corresponding values in Column C.

* The main execution script is placed first
* Dependency files follow in the correct order

<figure><img src="https://docs.testwheel.com/images/document-upload-images/userData-sheet.png" alt=""><figcaption></figcaption></figure>


# Uploading Selenium Script

The **Selenium Reverse Engineering** feature in TestWheel enables users to upload existing Selenium automation scripts and automatically convert them into a structured **Page Object Model (POM)** framework.

The **Selenium Script** module allows users to upload, manage, and execute Selenium automation scripts directly within the platform. This feature supports flexible automation integration by enabling teams to reuse existing Selenium test scripts instead of recreating automation frameworks manually, helping improve automation efficiency and centralized test management.

Supported upload formats include:

* **ZIP files** containing complete automation projects
* **Java files** containing individual Selenium test scripts

<figure><img src="/files/LTdsxPkOZnHC9TTmAwlP" alt=""><figcaption></figcaption></figure>

#### **Managing Uploaded Scripts**

After a successful upload, users can manage imported automation files directly within the platform. Uploaded files can be **rearranged** and organized in the required **execution sequence** to ensure proper automation flow.

* The **main execution** script should be placed **first**
* **Dependency** and **supporting files** should follow in the **correct order**

<figure><img src="/files/rtJVRNVfa3QvaSZr3U0J" alt=""><figcaption></figcaption></figure>

After the user clicks the **Submit** button in TestWheel, the uploaded document is saved successfully, and the system automatically navigates the user to the **Application** page.


# Test Results

This Page describes about the Test Results page in TestWheel application.

Users can access the **Test Results** by clicking the corresponding icon in the left-side navigation bar. Upon clicking, users will be able to view a comprehensive list of all previously executed tests along with their detailed reports.

* **Functional Tests**:\
  For functional test executions, users can:
  * View and download **PDF reports**
  * Watch **test execution videos**
  * Access detailed **bug reports**
    * From the bug report view, users can directly create bug tickets in **Azure** and **Jira**, streamlining the issue-tracking process.
* **REST API Tests**:\
  For REST API test executions, users can:

  * **Download PDF reports**
  * Check the **test execution status** for each API test

  <figure><img src="/files/WWi9vBTfXZBpzHVVeSZP" alt=""><figcaption></figcaption></figure>

This feature offers users a centralized and user-friendly way to track test outcomes, review detailed evidence, and initiate bug tracking actions seamlessly.


# Api Management

This Page describes the API Management feature in TestWheel application.

The **API Management** feature in TestWheel enables users to trigger test executions through **REST API** calls. For every application created, TestWheel generates a unique **API URL** that allows users to initiate test execution seamlessly.

When the API URL is accessed, the test execution is triggered automatically and runs securely in the background. Once the test execution is completed, the test results are automatically sent to the user’s registered email address for review.

Each generated API URL remains active for **90 days**. After the validity period expires, the system displays the API expiry status. Users can renew the API validity easily by clicking the **Renew** button. The platform also provides an option to **Deactivate** the API at any time, giving users greater control and flexibility over API usage and access management.

<figure><img src="/files/7gM1wRhyvA7xpMTf84CU" alt=""><figcaption></figcaption></figure>


# Application Data

This Page describes the Application Data feature in TestWheel application.

The **Application Data** module in TestWheel allows users to create, manage, and maintain test data required for automation testing. This module helps users configure application authentication details, UI properties, test scenarios, and user data in a centralized interface for efficient test execution management.

Users can access the **Application Data** page by selecting the **Application Data** icon from the TestWheel Dashboard.

<figure><img src="/files/kpMEQpCAwnYNVYZfbEAI" alt=""><figcaption></figcaption></figure>

### **Selecting Application** <a href="#selecting-application" id="selecting-application"></a>

After opening the **Application Data** module in TestWheel, users must select the required **Application** and corresponding **Version** from the dropdown lists of registered Web Applications. Once the application and version are selected, click the **View** button to load the Application Data configuration page

<figure><img src="/files/PovkPcOdnZmuJnrkooF5" alt=""><figcaption></figcaption></figure>

## Application Data Configuration

After clicking the **View** button, the Application Data page opens with the following configuration tabs:

1. **Authentication**
2. **UI Property**
3. **Test Scenario Details**
4. **User Data**

These tabs help users configure complete test data required for automation execution.

## **1. Authenticaton** <a href="#id-1-authenticaton" id="id-1-authenticaton"></a>

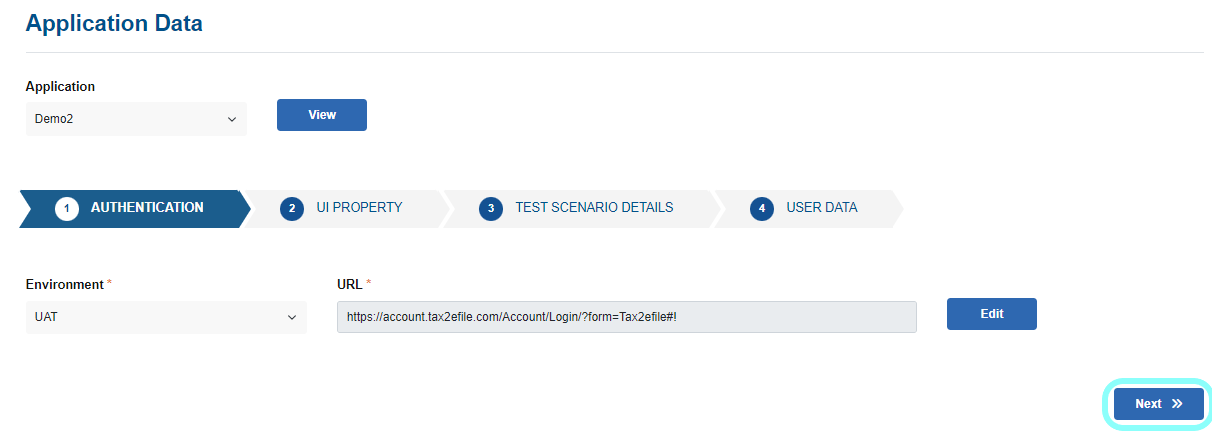
In the **Authentication** tab, users must select the required **Environment** from the dropdown list and provide the **Target Test URL** of the application in the URL input field.After entering the required details, click the **Next** button to proceed to the **UI Property** tab.

<figure><img src="/files/maIOl4zoNc4oxSawZbU7" alt=""><figcaption></figcaption></figure>

<figure><img src="https://docs.testwheel.com/application-data/images/applnData_Auth.png" alt=""><figcaption></figcaption></figure>

### 2. UI Property

The **UI Property** tab allows users to create and manage UI element details required for automation testing.

Users can click the **Add New** button to create a new test case and enter the required **Data Sheet Name**. After that, users must fill in the UI Property table with the following details:

* Property Name
* Locator Type
* Locator Value
* Selenium Action
* ID Value
* Description
* Expected Result
* Pass Result
* Fail Result

After entering all required information, click the **Submit** button to save the UI Property data successfully. Then click the **Next** button to proceed to the **Test** **Scenario Details** tab.

<figure><img src="/files/6UfJEkyQfgLCubFsya8R" alt="hi"><figcaption></figcaption></figure>

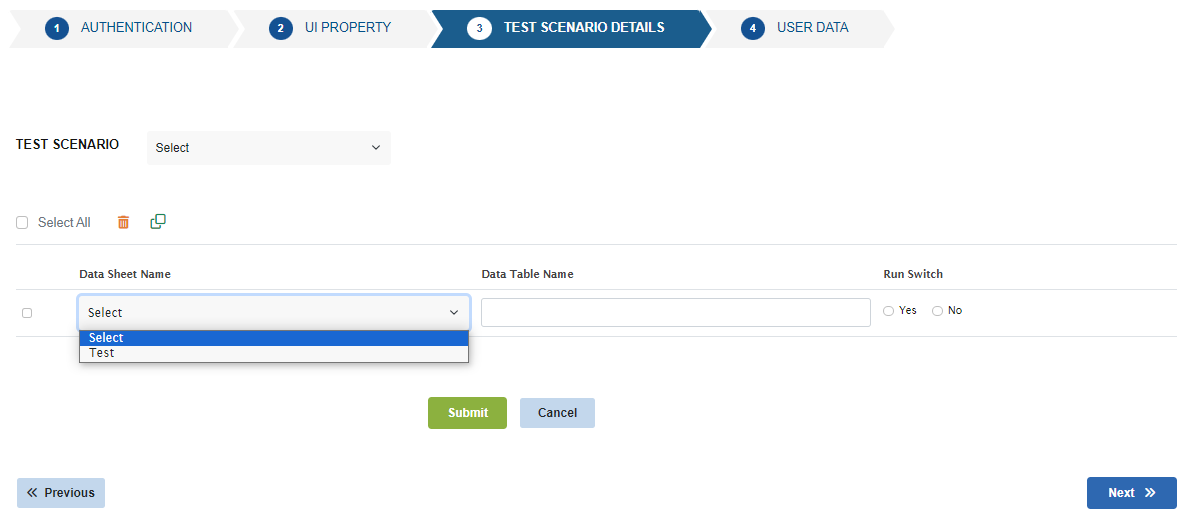
### 3. Test Scenario Details

In the **Test Scenario Details** tab, users can configure automation test scenarios by clicking the **Add New** button.

Users must:

* Select the previously created **Data Sheet Name**
* Choose the required **Sheet Name**
* Enter the **Data Table Name**
* Configure the **Run Switch** option

The **Run Switch** option allows users to define whether the scenario should be executed:

* **Yes** – Execute the scenario
* **No** – Skip the scenario

After entering all required details, click the **Submit** button to save the test scenario configuration.

<figure><img src="/files/a6djqRs6pY0wzqQeh1jB" alt=""><figcaption></figcaption></figure>

<figure><img src="https://docs.testwheel.com/application-data/images/applnData_TestScenario.PNG" alt=""><figcaption></figcaption></figure>

## **4. User Data** <a href="#id-4-user-data" id="id-4-user-data"></a>

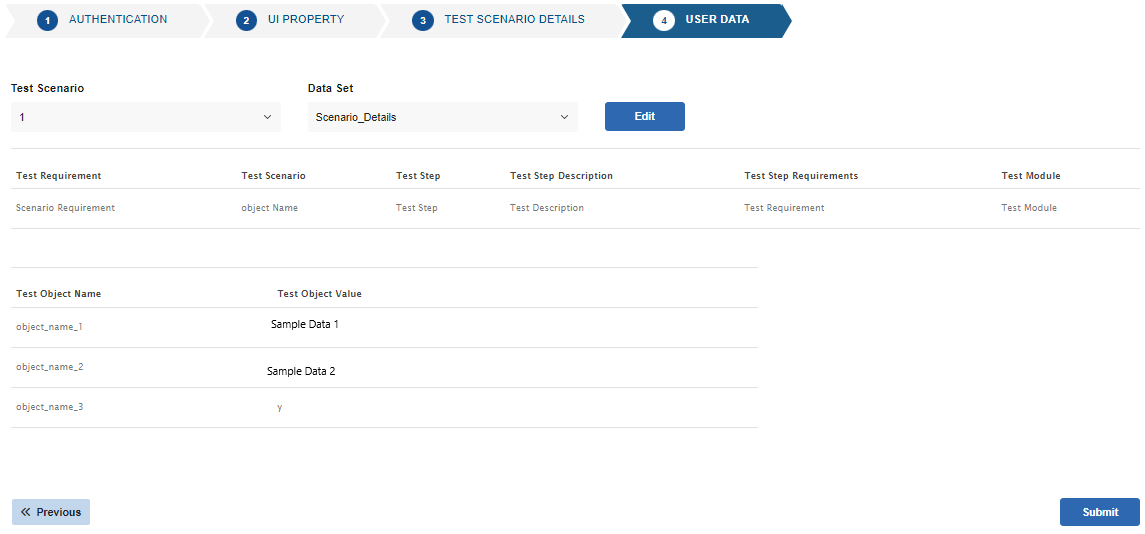
Users must select the required **Test Scenario** and corresponding **Data Set** from the dropdown lists. Based on the selected configuration, users can manage and provide the necessary scenario data required for the automation process.After entering the required details, users can click the **Submit** button to save the User Data configuration successfully.

<figure><img src="/files/jPkAD415RjgbTXTHdBwX" alt=""><figcaption></figcaption></figure>

<figure><img src="https://docs.testwheel.com/application-data/images/applnData_UserData.PNG" alt=""><figcaption></figcaption></figure>

### **Editing the Uploaded Test Data** <a href="#editing-the-uploaded-test-data" id="editing-the-uploaded-test-data"></a>

Users can use the **Application Data** module in TestWheel to perform **Edit** and **Delete** operations for uploaded Excel documents associated with the selected application. Users can also trigger the automation test execution directly from the **Application** page.


# API Test

**API testing** is a critical component of the software development life cycle, ensuring that backend services function reliably and efficiently. **TestWheel** offers a comprehensive, end-to-end automated testing solution that simplifies and streamlines the API testing process.

With its **user-friendly interface**, TestWheel allows users to create and manage test cases in just a few easy steps. Whether you're a seasoned tester or someone with no coding experience, TestWheel empowers you to perform API testing seamlessly and effectively.

Our platform also supports **customized and automated API call sequences**, enabling users to replicate complex workflows, validate response accuracy, and detect unexpected errors. This powerful functionality helps teams maintain consistent performance and quickly identify issues before they reach production.

## To start with **API Testing**

Create an application within Testwheel and select the type as REST API and proceed to register it with Testwheel. For guidance, please refer the image provided below.

<figure><img src="/files/L18AETJBQOYOK2UsCPTA" alt=""><figcaption></figcaption></figure>

![Create Application](https://docs.testwheel.com/api-testing/images/API-createTest.png)

## **Adding Testcase For API Testing** <a href="#adding-testcase-for-api-testing" id="adding-testcase-for-api-testing"></a>

After creating the application, navigate to the **API Test** module from the menu. On the **API Test** page, the application drop-down displays two application types: **REST API** Application and **Web** **Application**. When a **Web Application** is selected, the **Fetch API Data** option becomes available. After executing a web test, all APIs captured during the test run are listed. Click **Fetch API Data** to load the captured API list.The captured APIs can then be reused for **API testing** within **TestWheel**.Please refer to the below image.

<figure><img src="/files/EmRAAwnJpgXu5pFV2oS3" alt=""><figcaption></figcaption></figure>

![Fetch API Data](https://docs.testwheel.com/api-testing/images/API-add-TestCase.png)

If you select a REST API Application, choose the preferred testing method from the following options:

<figure><img src="/files/6YvGzd8Qc1J6k8q1M0c9" alt=""><figcaption></figcaption></figure>

## Swagger Import

Enter the **Swagger URL** in the provided field and click the **Fetch icon** to automatically import all available API endpoints. Once the endpoints are loaded, users can select the specific API endpoint for which test data needs to be generated and then click the **Generate Test Data** option. Alternatively, users can manually enter test data using the **Edit icon**.

<figure><img src="/files/xTTHtFQrcbkDoLUirTQH" alt=""><figcaption></figcaption></figure>

When users click **Generate AI Test Data**, three test data rows are automatically generated: **Positive**, **Negative**, and **False Positive**. These generated test cases can be modified further if required. After entering or verifying the test data, the test case is enabled and ready for execution. Refer to the screenshot below for guidance.

<figure><img src="/files/OVwm7mGM7MxCXAIlsoIf" alt=""><figcaption></figcaption></figure>

## **Manual API Test Setup**  <a href="#test-trigger-for-api-testing" id="test-trigger-for-api-testing"></a>

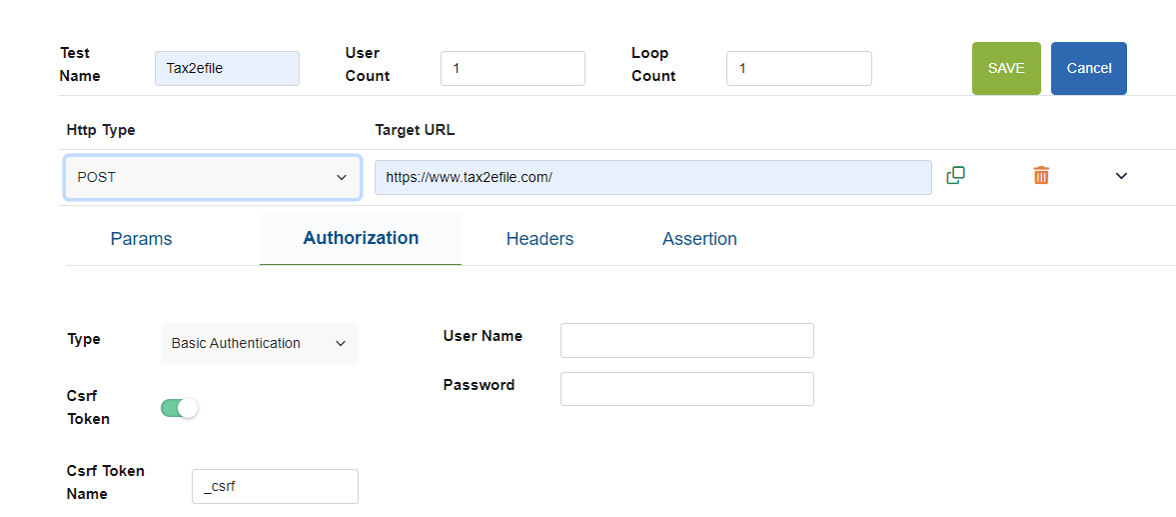
Click the **Add Test Data** button and fill in the required fields, including: Test Name, HTTP Method, Target URL, Params, Authorization, Header, and Body. Then save the changes.

<figure><img src="/files/Gv1BqwYCwPUKFSD7OY1x" alt=""><figcaption></figcaption></figure>

## **JWT Authentication**  <a href="#test-trigger-for-api-testing" id="test-trigger-for-api-testing"></a>

If you select **JWT Authentication**, TestWheel enables testing of secured APIs that require JWT-based authentication for access control and response validation. To configure JWT authentication:

<figure><img src="/files/xN4aN6I2pqFlRIGz7Ate" alt=""><figcaption></figcaption></figure>

Click **Add JWT Data** to open the JWT authentication configuration window. Enter the required details, including: HTTP Method, Target URL, Params, Authorization, Headers, and Request Body. Click Save to store the JWT configuration. Once the JWT data is saved, the following options become available: **Edit JWT Data** – Modify the existing **JWT** configuration. **Add Test Data** – Add API test case details.**Click Add Test Data** and enter the required API test information. After saving the details, the API test cases are displayed in the test list(refer to the screenshot below).

<figure><img src="/files/hKZ6XJph8cgN40956Hj0" alt=""><figcaption></figcaption></figure>

## **Test Trigger for API Testing** <a href="#test-trigger-for-api-testing" id="test-trigger-for-api-testing"></a>

After adding the **API test cases**, navigate to the **Application** page and click the **Run** icon to execute the test. If both a **web test** and a **Fetch API test** are configured for a **Web Application**, **two run icons** are displayed on the Application page, one for the **Web Test** and another for the **Fetch API** Test. After entering the Fetch API test data, click the **Fetch API** Test run icon to execute the API test automatically. Refer to the image below for guidance.

<figure><img src="/files/elP1ILKAEPlMaRqFUIUZ" alt=""><figcaption></figcaption></figure>

## **API Test Report** <a href="#api-test-report" id="api-test-report"></a>

To access the API test results, navigate to the test results page and click on the report icon to download the test report for viewing. Please refer to the image below for guidance.

<figure><img src="/files/LNHRfqMalFqVxfmvk1HV" alt=""><figcaption></figcaption></figure>

<figure><img src="https://docs.testwheel.com/api-testing/images/API-TestReport.png" alt=""><figcaption><p>API Test Report PDF</p></figcaption></figure>


# Load Test

**Load Testing** is a vital form of performance testing used to assess how a system behaves under expected user loads. The primary objective is to verify that the application can handle a specified number of **concurrent users**, **transactions**, and **data volumes** without experiencing slowdowns, crashes, or failures.

By simulating real-world usage conditions, load testing helps uncover **performance bottlenecks**, **scalability limitations**, and other potential issues that may impact the user experience. It ensures that the system meets predefined **performance benchmarks** and remains stable and responsive under pressure—making it an essential step before deployment to production environments.

To get Started with Load Testing you should select the Load Test icon from the side menu bar in Dashboard page. Upon clicking it will direct the user to Load Test page.

<figure><img src="/files/PBof1CWLNF4c4aLQsu5N" alt=""><figcaption></figcaption></figure>

![loadTest Dashboard](https://docs.testwheel.com/load-testing/images/loadTest_Dashboard.png)

## **Select Application** <a href="#select-application" id="select-application"></a>

Select the Application which has been created from Application page in Application Dropdown, the selected Application can be WEB APPLICATION or REST API Application for which user wants to perform Load Test.

<figure><img src="/files/9paK5sMgJjva5qzgc1tN" alt=""><figcaption></figcaption></figure>

![loadTest Select application](https://docs.testwheel.com/load-testing/images/loadTest_SelectAppln.png)

## **Adding Test Case** <a href="#adding-test-case" id="adding-test-case"></a>

When an application is selected, users have the option to add a new test case by clicking the Add Test Case button. They can fill in the input fields and then click the Save button to store the load test data in Testwheel. Once saved, users have the privilege to perform Edit and Delete actions for the created test case.

<figure><img src="/files/iAUZCs9TpGV2CZqnYB6z" alt=""><figcaption></figcaption></figure>

![loadTest AddTestCase](https://docs.testwheel.com/load-testing/images/loadTest_AddTestCase.png)

## **Adding Authorization** <a href="#adding-authorization" id="adding-authorization"></a>

If needed, users can input authorization details by navigating to the Authorization tab. They can then select the type of authentication and enter the credentials into the provided input field. By default, the CSRF Token toggle is Disabled. Once the user activates the CSRF Token toggle switch, they can input the token value into the designated input field.

NOTE: To Load Test a CSRF enabled site, the first URL provided must be of Home page or sites Landing page.

The Second URL should be for Login and must have an authorization type selected as Basic Authentication with username and password and CSRF must be enabled.

All the remaining test URL must be added below the second target URL only.

In case of any failure in the above-mentioned steps would result in test failure for all the target URLs for the particular testcase.

<figure><img src="https://docs.testwheel.com/load-testing/images/loadTest_Csrf.PNG" alt=""><figcaption></figcaption></figure>

**NOTE:** Editing the first and second target URL of the CSRF enabled testcase is not recommended.

Disabling the CSRF Token of the second target URL is strictly not recommended because it would result in entire test case failure.

If needed then the second request username, password and CSRF token name can be updated but the authorization type must not be changed from Basic Authentication to none under any circumstances.


# Security Test

This page describes about the Security Test Module in TestWheel application.

The **Security Test** module in TestWheel enables users to perform security testing for Web Applications and REST APIs. This module helps identify security vulnerabilities, detect potential threats, and improve application security by validating application behavior against common security risks.

Security testing is an important process that helps protect sensitive data, enforce secure access controls, and maintain reliable application functionality. By identifying vulnerabilities early, organizations can improve security compliance and reduce security-related risks

### Accessing the Security Test Module

To start security testing, navigate to the **Dashboard** and select the **Security Test** icon from the side navigation menu. Clicking the icon redirects users to the Security Test page.

<figure><img src="/files/Hz0mx1MXJV89NE0N1vn2" alt=""><figcaption></figcaption></figure>

## Select Application

Before creating a security scan in TestWheel, users must select an application from the **Application Dropdown**. The selected application can be either a **Web Application** or a **REST API Application**, depending on the type of security testing required. Selecting the appropriate application allows users to configure and execute security scans for the target application environment effectively.

<figure><img src="/files/9XSoTybnMfDy05nmmnBi" alt=""><figcaption></figcaption></figure>

## &#x20;Adding Scan Data

After selecting an application, users can create a new scan configuration by clicking the **Add Scan Data** button. The Add Scan Data page allows users to configure the required scan details for the security test.

<figure><img src="/files/XZo4uy4ypGnZpEht1q06" alt=""><figcaption></figcaption></figure>

### Target URL Configuration

Users must provide the **Target URL**, which represents the base URL of the application that will be scanned during the security testing process.

**Important:** Ensure that the Target URL is valid and accessible before starting the scan.

<figure><img src="/files/5wYrGQleDbNvgtVetyYr" alt=""><figcaption></figcaption></figure>

After entering the required details, click **Save** to store the scan configuration successfully.

### Managing Scan Configuration

After the scan configuration is saved, the TestWheel Security Test dashboard displays the configured scan entry along with its details. From this page, users can manage the saved security scan configuration efficiently.

Users can perform the following actions:

* **Edit Scan Data** to modify the existing scan configuration
* **Start Scan** to initiate the security testing process

<figure><img src="/files/ze8zrvAIuxuearoeycIe" alt=""><figcaption></figcaption></figure>

### Authenticated Scan

If the application requires user authentication, users must enable the **Authenticated Scan** option  in TestWheel. Once the option is enabled, users are required to provide the **Login URL**, **Username**, and **Password** to allow the security scan to access authenticated areas of the application.

<figure><img src="/files/RHP5V1LWeH3gPdYY9tzs" alt=""><figcaption></figcaption></figure>

After entering the required authentication details, click the **Save** button to securely store the scan configuration.

**Important:** The provided login credentials must be valid; otherwise, the authenticated security scan may fail.

### Start Security Scan

Once the scan configuration is completed, users can click the **Start Scan** button to initiate the security testing process in TestWheel. During execution, the platform scans the selected application for **potential security vulnerabilities** based on the configured scan settings and authentication details. After the scan is completed, TestWheel generates **security testing results** that help users analyze vulnerabilities, review security findings, and improve overall application security.

<figure><img src="/files/pLMTBVwfMeFthrZnAU7l" alt=""><figcaption></figcaption></figure>

### Security Test Results

After the security scan is completed, users can review the generated **Security Test** **Results** directly from the TestWheel platform. The **Test Result page** displays **detected vulnerabilities, scan findings,** and **security-related information** identified during the testing process. These results help users analyze application security issues, track vulnerabilities efficiently, and improve the overall security of **Web Applications** and **REST APIs.**

<figure><img src="/files/YKTrwglK3tWrCRugyaaD" alt=""><figcaption></figcaption></figure>

Users can click the **Report icon** available in the Test Summary section to view and download the detailed **Security Test Report** for the completed scan.


# Manual Test Case

This Page Describes about the Manual Testing Module in TestWheel application

Turn manual effort into automation with **TestWheel**! Our **Manual Test Case** module lets you easily import your manually written test cases — either by uploading Excel sheets or pulling them directly from the **Azure** and **Jira** ticketing tool. With the power of AI, TestWheel instantly generates functional automation scripts, helping you test smarter and faster.\
\
To get Started with Manual Test Case you should select the Select the Manual Test Icon from the side menu bar in Dashboard page. Upon clicking it will direct the user to the Manual Test Page.\
\ <br>

<figure><img src="/files/pKikwA5rIFmdgGrx1dFh" alt=""><figcaption><p>Manual Test Case icon from Dashboard Page</p></figcaption></figure>

## Select Application

From the **Application** dropdown, select the application you created on the **Applications** page. The selected application should be a **Web Application**, depending on where you want to perform functional testing by importing manual test cases.

Once an application is selected, a list of available **Test Names** will be displayed in the dropdown. Selecting a **Test Name** will populate the table below with its corresponding manual test cases.\
If no **Test Names** exist for the selected application, the dropdown will remain empty. In that case, click the **Upload Test Case** button to import and load the manual test cases for the chosen application.\
\ <br>

<figure><img src="/files/4w0akSQG4CgU798z48wD" alt=""><figcaption><p>Upload Test Case Button</p></figcaption></figure>

## Excel Based Upload Test Case

In the **Excel-Based Upload Test Case** process, users must first download the sample Excel sheet provided on the screen. After entering the manual test cases into the sheet, users should upload the completed Excel file along with specifying a **Test Name**, and then click the **Upload** icon.\
Once uploaded, all the test cases from the Excel sheet will be imported into **TestWheel** and displayed in the **Manual Test Case** screen.<br>

<br>

<figure><img src="/files/7qjsThd7x0tlGjaEnooD" alt=""><figcaption></figcaption></figure>

## Azure Import Test Case

In the **Azure Import Test Case** process, users can directly import their test cases from the **Azure** **DevOps** tool into the TestWheel application to perform **functional testing**. Before starting the import process, users must configure and save their **Azure DevOps** details in the **Integration** page. To begin, select **Azure** as the import type. The system will then guide you through the following steps **Select the Board, Choose the Test Plan, Select the Test Suite, View and select the available Test Cases**. After selecting the required test cases, provide a **Test Name** and click the **Submit** button. The selected test cases will then be successfully imported and displayed on the Manual Test Case screen, where they can be used for further functional testing.\ <br>

<figure><img src="/files/tZDktF4sVB8avlzELIle" alt=""><figcaption></figcaption></figure>

## Jira Import Test Case

In the **Jira Import Test Case** process, users can directly import their test cases from the Jira tool into the **TestWheel** application to perform **functional testing**. Before starting the import process, users must **configure** and save their **Jira details** in the **Integration** page. To begin, select **Jira** as the import type. Once selected, the configured **Project Key** will be displayed. The system will then guide you through the following steps, **Select the Project, Enter the Zephyr Token, View and select the available Test Cases**. After selecting the required test cases, provide a **Test Name** and click the **Submit** button. The selected test cases will then be successfully imported and displayed on the **Manual Test Case** screen, where they can be used for further functional testing.

<figure><img src="/files/nC4JvVvMm8YiyqQdcEaD" alt=""><figcaption></figcaption></figure>

## Automate Manual Test Case

Once the user imports manual test cases using either method, clicking the **Automate** button will initiate AI processing to automatically generate the corresponding automation test scripts.\
After the scripts are successfully generated, the user will receive an email notification confirming the completion. The user can then proceed to perform **Functional Testing** by triggering the automated tests from the **Applications** page.<br>

<figure><img src="/files/nZmYdLkfPbZmfpFcdu6u" alt=""><figcaption><p>Automate Test Case Button</p></figcaption></figure>


# Mobile Test

This page describes about the Mobile Test Module in TestWheel application.

The **Mobile Testing** module in TestWheel allows users to manage and execute **mobile automation** testing activities within the platform. Users can navigate to the Mobile Test module by scrolling through the side navigation panel on the **TestWheel dashboard** and selecting the Mobile Test icon, as shown in the screenshot below.

<figure><img src="/files/6xw7aeMAg6XwB0fujAqQ" alt=""><figcaption></figcaption></figure>

### Create Application

<figure><img src="/files/Y8P6rDfs18UNlIpQEmWL" alt=""><figcaption></figcaption></figure>

To begin mobile testing, users must create a mobile application by clicking the **Add New Application** button. This opens the Create Application page, where users are required to provide all mandatory details, including the Application **Name,** **Description,** **Environment,** **Mobile Platform (Android or iOS), OS Version,** Target Device, and the application file in **APK** or **IPA** format.

<figure><img src="/files/KJEKRFWOZR9caaDro1aj" alt=""><figcaption></figcaption></figure>

After entering all required information, clicking the **Register** button successfully creates the mobile application for further testing activities. The Mobile Applications page provides a centralized view for managing registered applications, enabling users to search, create, edit, and monitor application configurations efficiently.

<figure><img src="/files/k58i2Px2GyCoZQsG0BdL" alt=""><figcaption></figcaption></figure>

#### Document Upload

After creating the application, **users** must **navigate to the Document Upload page** and **upload the required testing documents**, including the **Authentication** Sheet, **UI Properties** Sheet, and **User Data** Sheet. Once all required documents are uploaded successfully, TestWheel **automatically enables the Run option** for the mobile application, allowing users to proceed with mobile test execution.

<figure><img src="/files/PSsqxxxuAA0dzzk0bi9S" alt=""><figcaption></figcaption></figure>

#### Test Run

To execute the mobile test, users can click the **Run** icon available for the registered mobile application. Once the Run option is selected, the system navigates to the **Test Result** page, where users can monitor the execution progress and view real-time test execution details. TestWheel then initiates the mobile automation execution process using the uploaded configuration files and selected device environment. This process allows users to validate application functionality and execute test scenarios efficiently.

<figure><img src="/files/g4gIFD4J7UxtYpC8Mqmy" alt=""><figcaption></figcaption></figure>

#### Edit Mobile Application

<figure><img src="/files/0YVjVdeaavNNSA1GbU8s" alt=""><figcaption></figcaption></figure>

Click the **Edit icon** to be redirected to the **Edit Application page**, as shown in the screenshot below.

<figure><img src="/files/SxtILcVFDm3iwoY6wk85" alt=""><figcaption></figcaption></figure>

Users can modify the required application details and click the **Update** button to save the changes successfully. While editing the application, users must ensure that the **selected OS version matches the uploaded application file version**; otherwise, the application update process may fail in TestWheel.


# Desktop Test

The **Desktop Testing** module in TestWheel enables users to automate and execute **desktop application testing** through seamless integration with the **TestWheel Agent** and **WinAppDriver UI Recorder**. The module supports capturing desktop UI elements, configuring automation templates, executing desktop test cases, and generating detailed execution reports from a centralized interface.

## **Prerequisites**

Before initiating **Desktop Testing**, users must install **JDK 22** and configure the necessary environment variables, including **`JAVA_HOME`** and **`PATH`**. Users are also required to download the **WinAppDriver UI Recorder** from the provided source, extract the ZIP package, and launch the **`WinAppDriverUiRecorder.exe`** application. Additionally, **Developer Mode** must be enabled on the machine prior to agent installation and element recording activities.

## **WinAppDriver UI Recorder**

The **WinAppDriver UI Recorder** is used to capture desktop application element properties such as **XPath** and Element ID. After launching the recorder, users can start recording and select the required UI elements within the desktop application. The captured locator information can subsequently be utilized while preparing the desktop automation template.

<figure><img src="/files/AS2oVifvFWlirkec6ePh" alt=""><figcaption></figcaption></figure>

## **Desktop Test**

The **Desktop Test** module can be accessed directly from the **TestWheel** Dashboard through the **Desktop Test** option available in the left-hand navigation panel. This interface provides access to template downloads, agent installation packages, desktop application management, and execution functionalities.

<figure><img src="/files/y8TVmHUrmZUV2pPdoPwa" alt=""><figcaption></figcaption></figure>

## Template Download and Configuration

The **First Download Icon** allows users to download the predefined desktop testing template required for desktop automation execution. This **template** is used to configure test steps, locator information, execution actions, input data, and validation messages required for the automation workflow. The template includes fields such as Step\_Name, Locator\_Type, Locator\_Value, Action, Input\_Data, Description, Success\_Message, and Failure\_Message. Users must populate the template with the appropriate execution details for each test step before uploading it into TestWheel for desktop test execution.

## Agent Installation

To establish **desktop** automation connectivity, users must download the **TestWheel Agent** by clicking the **second Download icon** available in the **Desktop Test module**. After initiating the download, a **secure passkey** is automatically sent to the user’s registered **email address** for authentication purposes. Once the agent installation begins, users must enter the received **passkey** to proceed further. After successful verification, users are redirected to the **Developer Mode** configuration screen, where Developer Mode must be enabled to **complete the installation** and **agent connection process successfully**.

<figure><img src="/files/fZesb7wK05jXJi18LJGj" alt=""><figcaption></figcaption></figure>

## Tray Icon Functionalities

The **Agent tray icon** provides operational controls such as **Pause Agent, Stop Agent, View Logs**, and **Exit**. These options allow users to temporarily pause execution, terminate running processes, review execution logs, or completely close and restart the agent when required.

<figure><img src="/files/wfVktVAXOLVwXT2l1BCT" alt=""><figcaption></figcaption></figure>

## Desktop Application Creation

Users can create a **new desktop testing** application by selecting the **Add New Application** option. The Create Application screen allows users to **configure** the application details and **upload the corresponding desktop automation template** before registering the application successfully within TestWheel.

<figure><img src="/files/Woy6LYAYie6Gr8fpMFPF" alt=""><figcaption></figcaption></figure>

## Test Execution

After the **desktop automation template** has been uploaded successfully, users can initiate execution by clicking the **Run icon** associated with the **desktop application**. TestWheel then triggers the configured desktop automation workflow through the connected agent.Upon completion of test execution, users can download detailed execution reports from the **Test Results** section.

<figure><img src="/files/x1ood2BkLdnoRNPP4azU" alt=""><figcaption></figcaption></figure>

## **Edit Desktop Application**

**Existing desktop application** configurations can be **modified** using the **Edit option** available within the application management interface. Users can update application details, replace automation templates, and save the revised configuration without recreating the application.

<figure><img src="/files/5JfEX4mZO41du5xKY1jH" alt=""><figcaption></figcaption></figure>


# Integration

The **Integration** module in TestWheel is used to configure and manage **Jira** and **Azure** integration details for defect tracking and project management activities. Users can access this page by clicking the **Integration** icon from the left-hand navigation panel.

<figure><img src="/files/DbC5qsJq05qPnMbqvTgd" alt=""><figcaption></figcaption></figure>

To configure the **integration** settings, click the **Configure** icon and enter the required **Jira** and **Azure** details. Users can also enable the **Auto Bug** option to allow automatic bug creation during test execution. Once all required information is provided, click the **Save button** to store the configuration successfully.

<figure><img src="/files/gr5wmNN4a9Y0Hhw79cYv" alt=""><figcaption></figcaption></figure>

<figure><img src="/files/OGanAH1yMfT21B8fvYeg" alt=""><figcaption></figcaption></figure>

After saving the configuration, the **integrated Jira and Azure** details will be displayed on the page. Users can click the **Eye icon** to securely view the saved configuration details whenever required.The **Auto Bug option** and **configuration settings** can also be enabled or disabled at any time based on testing and project requirements.

<figure><img src="/files/6NlQgdVJDDhBKE7NycxG" alt=""><figcaption></figcaption></figure>


# Test Bot

The **Test Bot** feature in TestWheel is an **AI-driven intelligent assistant** designed to streamline and accelerate software testing workflows. It enables users to perform multiple testing operations through a unified interface, significantly reducing manual intervention while improving productivity, execution efficiency, and overall testing accuracy.

To initiate testing using **Test Bot,** users must select the **Test Bot** option highlighted within the application interface and enter the required query in the input field. Based on the provided request, **Test Bot** intelligently processes the input and executes the corresponding testing operation automatically..

<figure><img src="/files/T5FkZ5IIV06PCRiZ3ciA" alt=""><figcaption></figcaption></figure>

For **API testing**, users are required to select the appropriate project, enter the API testing request in the input field, and click the **Send** button to initiate execution. Upon successful processing of the request, users can navigate to the API Test page and select the same project to view the generated API requests, associated API details, and execution information. API testing functionality is supported exclusively for **Web Applications** configured within the **TestWheel** platform.

<figure><img src="/files/QlYWiOcWuDMR16Alw1cw" alt=""><figcaption></figcaption></figure>

In addition to API testing, **Test Bot** also provides **AI-powered test data generation** capabilities. To generate test data, users must select the required project and click the highlighted form option to navigate to the **AI Test Data Generator** page. After entering the mandatory configuration details and submitting the request, **TestWheel** automatically generates the required test data based on the provided inputs. Users can subsequently access the **Test Data List** page to review the generated test data, execution status, and associated generation details.

<figure><img src="/files/lrGlRXPtGjzlhvQrsjfx" alt=""><figcaption></figcaption></figure>

<figure><img src="/files/BCeOMJdu30EXnIOjurpP" alt=""><figcaption></figcaption></figure>

<figure><img src="/files/rmbSoZmjEWnbwb0vXOiJ" alt=""><figcaption></figcaption></figure>


# Tools-PDF Compare

This page describes about the Tools in TestWheel application.

The **Tools** module in TestWheel provides document comparison utilities that help users identify differences between document versions and validate content accuracy efficiently. The module includes features such as **PDF Compare** and **DOCX Compare**, allowing users to analyze changes between uploaded documents in a centralized interface.

<figure><img src="/files/lUrVg5wcokLhd0TurdEy" alt=""><figcaption></figcaption></figure>

## PDF Compare&#x20;

Selecting the **PDF Compare** option from the Tools menu opens the PDF Compare page, where users can upload and compare PDF documents, as shown in the screenshot below.

<figure><img src="/files/A5QF18JeMjlI6ypJvnpT" alt=""><figcaption></figcaption></figure>

Users can click the **Browse File** option to select the required PDF files for comparison. After uploading the files, clicking the **Compare** button initiates the document comparison process.

<figure><img src="/files/1h7YIkWgsXtfViIHyiFQ" alt=""><figcaption></figcaption></figure>

Once the comparison is completed, the system automatically generates a comparison report highlighting the **detected changes**, **content differences**, and **modified sections** between the uploaded PDF documents.

<figure><img src="/files/1PgwRLRiOu1M7Sf6w2mS" alt=""><figcaption></figcaption></figure>